


IC 0170
Graphics processing configuration - Print channel -
Once you have created a new print channel and completed the mandatory configuration of the Input file control and the Printer & After print setup, you are probably done with the print channel setup and can start printing.
The channel will work with a default configuration for the graphics process, which provides high throughput and projects the file content in its original size 1:1 to the printer output. The vast majority of use cases are well served by this configuration.
But AutoPrint rendering engine can do much more:
- Enable/disable the processing of certain file type like plain text or html files
- Change the internal processing resolution
- Scale the contents to a precisely defined area on the printer page
- Overlay a static graphic object like a watermark or a company header
- Add a header or footer text element
- Add a barcode or QR-code object
All of these additional capabilities are options that can help meet specific needs.
NOTE: As the Graphics processing configuration directly depends on the printer properties, it is highly recommended performing the printer configuration first.
NOTE: Like during the most setup work you can let the main application (or the service) keep running all printing jobs. The new or modified channel will be restarted after you have saved all settings.
Open the Graphics processing tab in the AutoPrint - Setup area:
2023-07-30
- Options - The following further items are set to default values or left empty. They can be optionally modified to support special use cases.
1 File type monitor
When you configured an input folder location, you might have stumbled upon the question, if everything in this folder is considered for printing.
May be the destination where a different process, program or persons store their data which should be ignored during the print channel observation.
Here you can choose which file types the print channel should react to.
NOTE: HTML-files may contain various scripting objects or may call external links. These objects are not available for AutoPrint, since dynamic data import from external sources is not supported by design.
2 Print quality
The print quality depends, among other parameters, on the processing resolution. You can choose whatever your printer is capable of, in the unit dpi (dots per inch). Just be aware, that a value higher than the needed result quality, will increase memory usage and processing time by square. Make sure that your computer is equipped with the sufficient amount of random memory. A dpi value in the range of 300 ... 600 has turned out as a very good compromise between demands and results in nearly all use cases.
Another quality key item is the resizing filter, which may be used in the scaling process, if activated (see option 3 below).
There are two recommended presets, which can be selected by a click: Good Quality (default) and Max Quality
3 Layer 0 - Input file contents - scaling options
Here you decide if and how the main input contents will be scaled in any way, or by disabling every option not influencing it in this perspective.
If a 1:1 document reproduction is required, the Center content to target print area should be enabled with the print area set (7) to the full page.
NOTE: All the following optional graphic objects are organized as layers, that will be successively drawn over the existing layers.
NOTE: The result of all layer object configurations can be instantly monitored on the preview panel/window, see (7).
4 Layer 1 - Static overlay object
Do you like to add a watermark, a company logo, or any other graphic of your choice? Here you can select a file and stretch it depending on your use case.
First enable the Layer 1 at the right edge of the relevant panel.
Then choose a graphic file, which contains the graphical overlay object.
The logical merging option allows the selection of one of several operations, default is ‘Normal’.
The opacity controller allow the adjustment of the transparency of the overlay object.
=> The positioning and sizing of the new object can be adjusted in the preview area (7).
5 Layer 2 - Header or footer text line
By using the Header or footer text object you can print additional information like time and date or document/page properties on your page.

First enable the Layer 2 at the right edge of the relevant panel.
Then enter the text that shall be shown in the header/footer line.
Basic system variables can be included here.
Finally select one of six possible locations on the printed paper.
6 Layer 3 - Barcode or QR-code
A barcode or QR-code object can be added anywhere on the printout sheets.
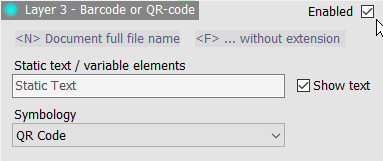
First enable the Layer 3 at the right edge of the relevant panel.
Then enter any static text that shall be shown as a barcode or QR-code object.
Basic system variables <N> or <F> representing the file name can be included here.
The Show text checkbox adds the output of the code content as a human readable text.
=> The positioning and sizing of the new object can be adjusted in the preview area (7).
7 Preview area
There is a small preview panel which gives a live view on the expected typical printout page.
Fore a larger, more detailed seperate window providing further tools for positioning and sizing please click the button in the middle of the panel.
8 Large preview window - Print page area
The separate preview window gives a more precise live view on the expected printout page.
9 Input object samples
AutoPrint provides two internal default input sample objects for testing the graphics processing configuration in a portrait or landscape orientation.
If you prefer, you can also select any other processable input file as an individual sample.
10 Object sizing and location
While hovering over one of these three panels the related object layer is activated for the interactive sizing work directly in the preview area.
Please note that only the layers that were previously activated will react.
A more detailed section for the understanding of the print page layout principle follows on the next information card.

11 Send raw data files
If enabled, AutoPrint will handle all other file types not among the items above as binary print files. Their content is sent directly to the printer spooler, there is no pre-processing. You can attach an opening and a closing code/text character sequence, if needed.
Typical use cases are ERP systems feeding Zebra label printers through ZPL-files.
NOTE: Not all printer drivers/spooler accept this kind of data transport. Check the printer documentation for options.
NOTE: The raw data function is not provided in the Free but not in the Demo license mode.
12 TXT direct print
Pure text files are normally rendered to a print page by the AutoPrint graphic processor. With the ‘Direct Print’ option, this standard function can be skipped by transporting the text content in the same way as the raw data shown in (11).
ONLINE MANUAL
AutoPrint in detail
